Sunday, February 23, 2014

Unrelated to Gardening: Building a "Floating" Slab Shelf

This is completely un-garden related since I don't have much going on right now.  Save for my daughter trying to eat my emerging Shooting Stars in the egg carton and my son trampling my seedlings in the front yard- we are just playing the waiting game.  Five Spots are starting to show up on the back hill (not surprising since they are in the same genus as the Baby Blue Eyes), but they are flowers that are spectacular when in a mass and easy to overlook as singletons, so it is still only minimally exciting.

This is a topic that is very different- I am sharing because I am proud of what I built, but more importantly, I am sharing because I could not find ANY other instructions on the web on how to do this and it really is quite simple when you do it this way.

I am talking about making a floating slab shelf- i.e. a thick piece of wood that does not have brackets to hold it up but is a solid shelf that you can put books on and other tschotskes.

I had a china cabinet that Cas and I used to put our various tschotskes from traveling etc that had sentimental appeal to us (READ: useless crap to which we are still too emotionally attached to dispense with).  We have a small house and work hard to reduce clutter (i.e. useless crap to which we are still too emotionally attached to dispense with) but it still remains.  The china cabinet was a huge, useless piece of furniture that only seemed to underline the fact that it housed useless crap to which we are still too emotionally attached to dispense with.   My solution was to dispense with the china cabinet and get some wood slabs to make some shelves that would be pretty to look at.

I knew that it was possible to embed rods into the wall and then epoxy the shelves onto them.  That knowledge was my starting point- but everything that I read online was for new construction where people had the walls open and were able to put on specially fabricated rods directly onto the studs, drywall around and then drill the shelves... blah blah it wasn't going to work for us.

Our house is pretty old and I was not about to open up the wall.  Further challenging us was the fact that our electrical box was behind the wall so it was hard to find the studs- everywhere you hit was wood since there is so much blocking.  This is how I came up with a solution.

First- get the slabs.  I got our Black Oak slab as a 13' long slab from Evan Shively (Arborica in Marshall CA).  It was a raw slab that I had them rip to 13" wide and planned it down at a friend's shop.  I then just sanded it down (using a sanding "cup" bristle attachment on a drill bit to finish the "live edge").  I finished it with a mix of Tung oil, mineral spirits and polyurethane.  Wanted a finish that looked natural and not polished but that would protect.

Next- mount the slabs.

Step ONE: find the EXACT center of your studs.  In our case, with all the blocking, I found the studs at the top and bottom of the wall and then worked down.  To find the exact center, I used a dry wall saw to cut into the dry wall near the stud until I found an edge.  I patched and painted the holes later.
This is how I found the EXACT center of the
stud.  You do NOT want to mis-drill.
Step TWO: Cut a strip of 3/4" thick board to the length of your desired shelf and rip it to the thickness of your shelf.  Mount it on the wall in the exact place where you will place your shelf and mark the center of the stud over this strip.  It first serves as a mockup of where your final placement of the shelf will be.
The board serves as a mock up of where you want to put the
shelf and then as a guide for your dowling jig and
then as a template for drilling the back of your shelf.
We wanted our shelves to be offset from each
other to give it a more wabi sabi look and allow
for taller objects.  

Step THREE: Use a dowling jig to mount onto the 3/4" strip and drill with a 7/16" bit into the stud.  The jig makes you drill exactly perpendicular to the wall without mistakes.  I think that I drilled 3" into the stud (plus room for the drywall), but I can't remember exactly now.  I had made a mockup wall and practiced on the fake wall first since I didn't want to do structural damage to our house.
Close up of the Dowling Jig
Step FOUR: Remove the 3/4" guide and drill it onto the back of your shelf and use that as a template for drilling the holes in the shelf.  Again, using the dowling jig makes you line things up exactly perfectly and drill exactly perpendicular to the wall.  This time, use a 1/2" bit (12" long).  I used 12" long rods, so I drilled about 1" longer than the rods would extend into the shelf to allow for the buildup of dust and debris as I installed the shelf.

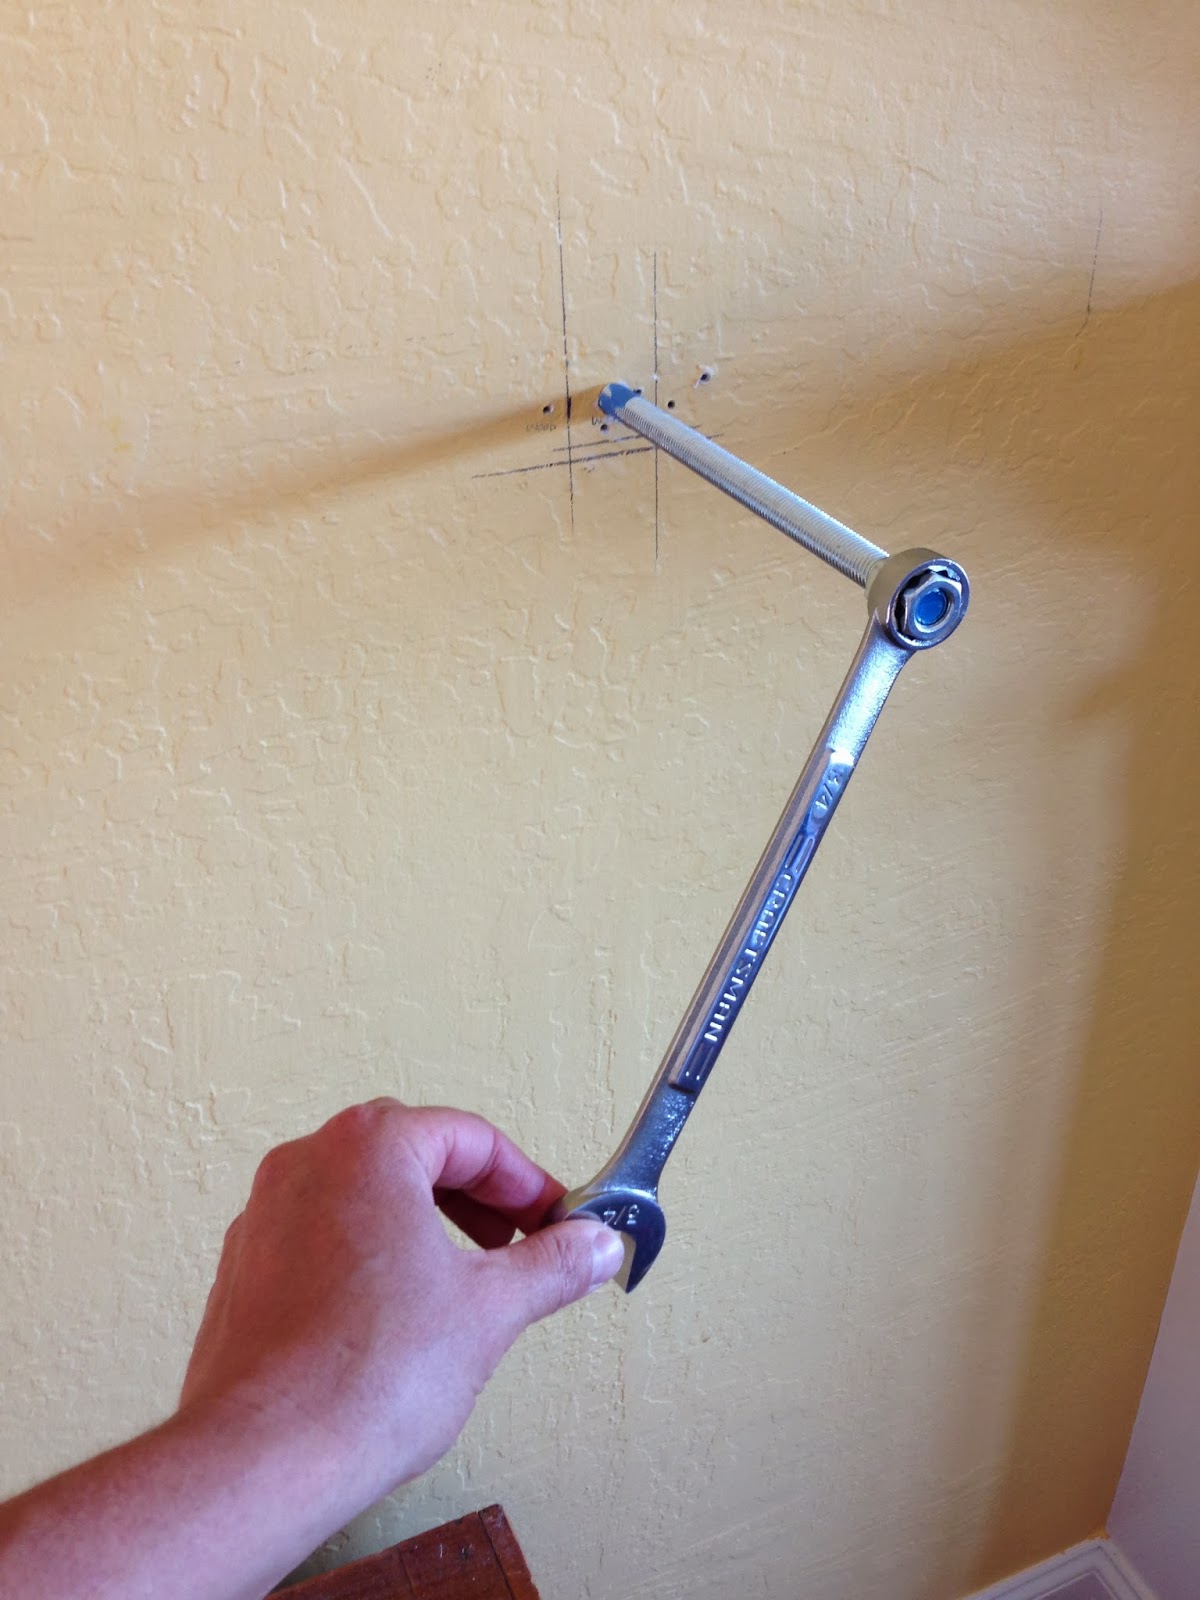
Step FIVE: Take 12" 1/2" threaded rod and place two 1/2" nuts as a jam on the end to help you screw it in.  The 7/16" hole is the exact right size to screw the rod into the stud- use the jammed nuts as a head to screw with.
Use two nuts to jam into a head to get a wrench
on in order to screw it into the wall.
Use the nuts to screw the rod into the stud.
Step SIX: Once the rods are in place, you can just "slide" the shelf into place.  By drilling the 1/2" hole, the rod will slip into it, BUT because the rods have flex, you will need to hammer it into place with a rubber mallet as it will not actually "slip" very easily.  There is no need for epoxy, the tension on the threaded rods will be enough to hold it into place.
LOOK MA!  NO brackets!
Black Oak with a "live edge"- not a milled face.

We have since further purged some of our
tschotskes, a perpetual process.
Done.  Easy peasy.

Saturday, February 22, 2014

An unwelcome native- Poison Oak

Behind our house is a 40 acre park that is all Oak/Bay woodland and has more than just a little Poison Oak.  Our property backs up against the park so although it is not our land- we do kind of have Oak Woodland in our "backyard" and with it, comes the Poison Oak.

I have never had it.  That is kind of amazing.  It might be that I am one of the 15% of the population who does not develop a reaction.  This would be rather incredible since I have highly sensitive skin and am alway breaking out in hives for one strange reason or another.  But, given just how much time I have spent out in the woods either hiking, doing field work or mountain biking, it seems nearly impossible that I have not been exposed.  Yet... I have never had a reaction.

Unlike most people who I know who have no had it- I have no arrogance in thinking that I am immune- instead I am arrogant enough to think that I am just that good at not touching it.  The funny thing is that despite never having it, I am terrified of it.  I treat it like jumping cholla- I think that even the lightest touch will cause me to be covered in hives that will never go away and land me in the ER with a corticosterone mainline drip.  Deathly afraid of the stuff and really good at seeing it from far away.

Thicker leaves- but both the red and green
are Poison Oak.
Given my deep (and largely irrational) fear, I did the most remarkable thing today... I went up onto the hill and started cutting down Poison Oak.  Me.  Pulling, cutting and tearing at vines and thickets of Poison Oak directly.  Turns out I don't like all native plants.

This will be a good test of my immunity to PO (or lack thereof) as I was cutting down trees of the stuff and my gloves ended up slick and shiny from the oils.  I had so much oil on them that it started to get hard to grab some of the vines that I was pulling onto my head.  I had no idea that the trucks could get that thick!  I cut down two vines that had wended up into the canopy that were easily 3-4" across at the base.  They were just starting to leaf out and the poisoned oil was seeping out.  I did wear long pants, boots, gloves and a sweatshirt.  I then hopped into the shower and did a VERY good scrubbing with Tecnu.
Not sure what fool took this picture... but this is what I was
terrified of doing!  It is a great shot to show some of the
diversity of the leaf forms.  They were clearly growing together
probably on the same plant.
And yes... this is also Poison Oak.  Damn.
I am including this mention only because so many people do not know what it looks like in all of its various forms.  It really is a beautiful plant and remarkable in its versatility.  In fact, I just learned this, the scientific name is Toxicodendron diversilobum (scientific name literally means "toxic plant with many shaped leaves").  In some places, it is a low and delicate ground cover.  Others, it forms thick shrubs and sometimes even vines like I cut today.  Sometimes the leaves are small- nearly as small as a dime.  Other times, they are quite big- as large as an oak from which it gets it name or larger.  They are sometimes bright green, other times, an olive shade- in the fall, they turn red and orange and are perhaps the most lovely.  The thing to look for is that they are shiny with the oils that cause the rash.  Three leaves (actually, leaflets) on a single stem- they often look a little like blackberry- with slightly lobate leaves that look like oak.

Newly emerging leaves are often red.  Notice the shine.
The only way to learn Poison Oak is to just look for it in all the different forms.  If you have been exposed, Tecnu is the tried and true best thing to use for it (as I have witnessed so many of my suffering friends and family use).  Hopefully, I will arise tomorrow and the next day not have the tell tale seeping red blisters.
Fall Colors on a vining form
The bright green delicate form, notice the
three leaves on a single stem, shiny bright green. 
It starts to get tricky- look for the three leaflets and the oily
shine.
Beautiful, right? Who would think that this
large thick shrub would be the same nasty beast as the
bright green woodland vine?


Thursday, February 20, 2014

Baby Blue Eyes in BLOOM!

I just came running into the house as I found my very first bloom upon the hill- our very first Baby Blue Eye!  I saw it from down at the bottom as a tiny speck and crawled up to inspect.  There are more buds on the way, so this really is the first of many.

Our VERY first native flower for the year.
Baby Blue Eyes Nemophilia menziesii are really a spectacular flower and one of the first to really draw me to the beauty of wildflower gardens.  When Caspar and I lived in our ramshackle place in Palo Alto, I had ripped out the ivy on the side yard and planted bulbs and threw out native seeds.  I had never seen Baby Blue Eyes before and they were truly epic when they came into bloom- forever winning me over and making me fall in love..

Here is a picture of our side garden back when I was pregnant with our twins.  This picture was taken in April and it was before they really started to get beautiful.  I love them so much and it was like seeing an old friend to catch a glimpse of one up on the hill.

They are a really aggressive flower and so I did not plant as many of them as some of our other seeds on the hill since I didn't want them to take over.  I plan on reseeding with them if I do not get as many of them this year as I would like.  They are one that are like Poppies- you know they will do well.

Me about 25 weeks pregnant with our
twins- I was on bed rest and didn't get to
see the flowers when they really got pretty.

A mass of Baby Blue Eyes from our
little side garden in Palo Alto.


In addition to being great just growing wild in gardens, they also form trailing masses which make them particularly beautiful along the top of a wall where they can cascade down or in a pot where they can spill about the sides.  They are easy to grow and really tolerant of a wide variety of conditions.  If you can grow Poppies, you can grow Blue Eyes (and Lupines and and and...).
Baby Blue Eyes also make a GREAT bulb cover. I planted beautiful red
Tulips, Daffodils, and Irises and they really were set off spectacularly when
everything came into bloom.  Again- this was just the start of the garden. I don't
have pictures of it when it was prettier as I was on bed rest and didn't get out to see it.

The Back Hillside

Our native garden experiment started with the back hillside in what was truly a grand experiment.  I ordered over 40 different species of seeds to throw out and just see what happens.  This was before I started thinking specifically about habitat and really just wanted to have pretty flowers on our hill which were native.  I know that of the 40- only a few will end up really doing well and outcompeting the others, but I didn't know which so I experimented in a big way.

I had to do some site work to prep it first- raked up mulch, dug up plants, attempted to solarize (method of killing weeds) by leaving out black plastic for a few months, laid down landscape jute cloth to hold the seeds in place and then seeded directly for most species and in flats for the rest.

My philosophy for the back was a bit different from the front.  For the back, I wanted kind of a crazy wildflower garden and put in some grasses to help stabilize the hillside- for grasses, I have Red Fescue, Slender Hairgrass, Idaho Fescue, CA Oatgrass, CA Bottlebrush Grass, CA Vanilla Grass & Blue Wildrye.  The grasses were more of an afterthought with the emphasis being on the wildflowers and species diversity.

For the wildflowers- I basically went nuts picking any seeds (both annual and perennial) that can handle some shade and do not need a lot of water.  I do plan on having a strip of 1/4" drip line along the fence so that I can have some of the plants that like a little more water in addition to the more drought tolerant species (wet "zones").  I really went a bit crazy on the seed order though...

I did all this work and seeded on Oct. 25th- right when you are normally supposed to plant, as it corresponds to when the fall rains come and the seeds come up for the winter growing season.  Since this year has been so dry, I have had to irrigate and things are a little slow getting going.

The back hill & chicken coop.  A 40 acre park butts up into our back
yard and the deer come through.  Oak, Bay woodland.
Close up of some of the germinating
plants on the hill.  
The hill does not look pretty yet, but you can already see the promise in how much is coming up and with how much diversity.  (The jute will degrade as the plants establish)  It is fun that I can already identify some seedlings from my previous experiments with growing native annuals.  One of the things that is fun about germinating in flats is that it really helps you learn to identify the seedlings so much better.  Here is a bit of a slideshow of our back yard- the hillside covered in landscape cloth with the flowers germinating, the flats, and a collection of what we planted... I expect that really only a handful of the species will become established between finding the right conditions and competition- so all the species that I picked are ones that will look pretty even if they are the only ones to thrive.

The solarization seems to have helped control weeds a lot but didn't kill anything that was a bulb.  We have some native Soap Plant bulbs, Sourgrass (the yellow clover) and some Watsonia.  For the Sourgrass and Watsonia, I have been pulling a lot out by hand and actually used some Round-up for a big patch of Sourgrass since it is a bulb and you can't easily get rid of it by hand weeding.  After reading that 5 years of dedicated weeding might remove Sourgrass- I felt better about using the spray.  I only did it in areas where it was clear it was out competing the natives.

One fun side note- we have found three different species of salamander (Arboreal, Ensatina and Slender) in our back yard since moving in last year.  When I move the flats, I often find some.  Last time I counted, I had 7 or so of the slender salamanders.  They look like large worms with eyes and legs. Fun!
Look closely- two CA Slender Salamanders
Batrachoseps sp.  (not positive about species
but probably attenuatus)
Here is my slide show! (Click on first photo to enlarge and flip through the pictures)

Showy Farewell to Spring, Miner's Lettuce (edible and yummy), Chinese Houses, CA Poppies, Mountain Phlox, Miniature Lupine, Sky Lupine, Five Spot, Baby Blue Eyes, Tansy-Leaf Phacelia, Rancheria Clover, White Yarrow, Western Columbine, Shaggy Alumroot, Douglas Iris, Blue Flax, Creek Monkeyflower, Coast Phacila, Buttercup, Pt. Reyes Checkerbloom, Blue-Eyed Grass, Yellow-Eyed Grass, Foothill Meadowrue, Narrow Leaf Milkweed, Globe Gilia & Bird's Eye Gilia.
Foothill Meadow-Rue
Thalictrum fedleri
Yellow Eyed Grass
Sisyrinchium californicum
Blue Eyed Grass
Sisyrinchium bellum
Pt Reyes Checkerbloom
Sidalcea calycosa
Buttercup Ranunculus californicus
Creek Monkeyflower Mimulus guttatus
Blue Flax Linum perenne spp. lewisii
Douglas Iris Iris douglasiana

Shaggy Alumroot
Heuchera pilosissima
Narrow Leaf Milkweed Asclepias fasciularis 
(Not the prettiest, but host to Monarch Butterflies)
Western Columbine
Aquilegia formosa
White Yarrow Achillea millefolium
Rancheria Clover Trifolium albopurpureum
Tansy-Leaf Phacelia Phacelia tanacetifolia
Showy Farewell to Spring
Clarkia amoena
Miner's Lettuce Clatonia perfoliata
Chinese Houses Collinsia heterophylla
California Poppy Eschscholzia californica
Globe Gilia Gilia capitata
Bird's Eye Gilia Gilia tricolor
Mountain Phlox Linanthus grandiflorus
Sky Lupine Lupinus nanus
Miniature Lupine
Lupinus bicolor
Five Spot Nemophila maculata
Baby Blue Eyes Nemophila menziesii